¶ NACVIEW Implementation
This manual was created to enable administrators to implement the NACVIEW system by themselves. The information in this document contains all necessary steps to implement the system on your own. This is an alternative to the standard deployment process carried out by a professional network engineer. The process of implementing NACVIEW consists of many stages. It begins with the system installation and configuring the PKI. Then integration with the domain and HA launching ( these stages are not required , they are recommended though) should follow.
The next stage is the network configuration , including adding appropriate subnets, VLANs and Wi-Fi networks to the system, and if necessary - also configuring DHCP. Further, you need to configure the network devices that belong to the environment. For the system to work properly, you also need to run authentication and configure supplicants. The last two stages are optional.These are: firewall configuration and Captive Portal configuration. In the following manual you will find both steps to be followed and relevant links to the existing documents, which will help you to implement the NACVIEW system.
¶ How to self-deploy the NACVIEW system?
It comes in a few following steps.
¶ 1. System installation
Installing the NACVIEW software involves enabling two installers again. The first is the CLI installer, which defines the basic parameters of the system. Then the web installer starts, which configures more advanced parameters. The detailed installation guide step by step you will find on our website.
¶ 2. PKI configuration
You can configure three types of CAs in NACVIEW. These are an internal CA, an external CA, and an external CA (external authority) with the ability to generate a CSR. How to configure each of them you can learn in the CA Installation document, located on our website in the Downloads > Documentation tab.
¶ 3. Domain integration
To integrate NACVIEW into your domain, you can use the existing statement called Active Directory. You can find it on our website in the tab Downloads > Documentation. Thanks to the correct configuration of Active Directory in the NACVIEW system, you can centrally manage the entire set of users in the network, determine their permissions to network resources, and also configure the computers on which they work.
Remark: If you follow the instructions mentioned above, note that the name of the wizard on your system has changed from Active Directory to LDAP/AD Directory Services
In this step you may want to configure authorization servers as well. To do this, use our instruction called Authorization Servers. Integration of the NACVIEW system with authorization servers will allow them to be used as a source of information. If the user is not created locally, information about them should be downloaded from the outside - by synchronizing with databases. Authorization servers in NACVIEW are divided into three different types:
- synchronization of administrative accounts
- identities
- end devices.
¶ 4. Launch of HA
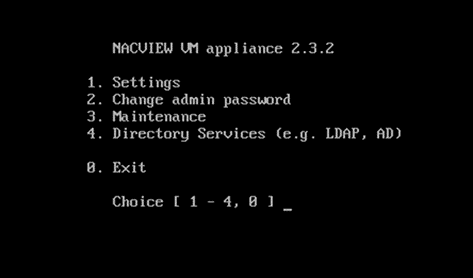
The next stage in the process of implementing the NACVIEW system is the launch of the HA cluster. To do this, you need to first log in to the CLI/SSH node. Select Settings by typing the appropriate number from the menu:

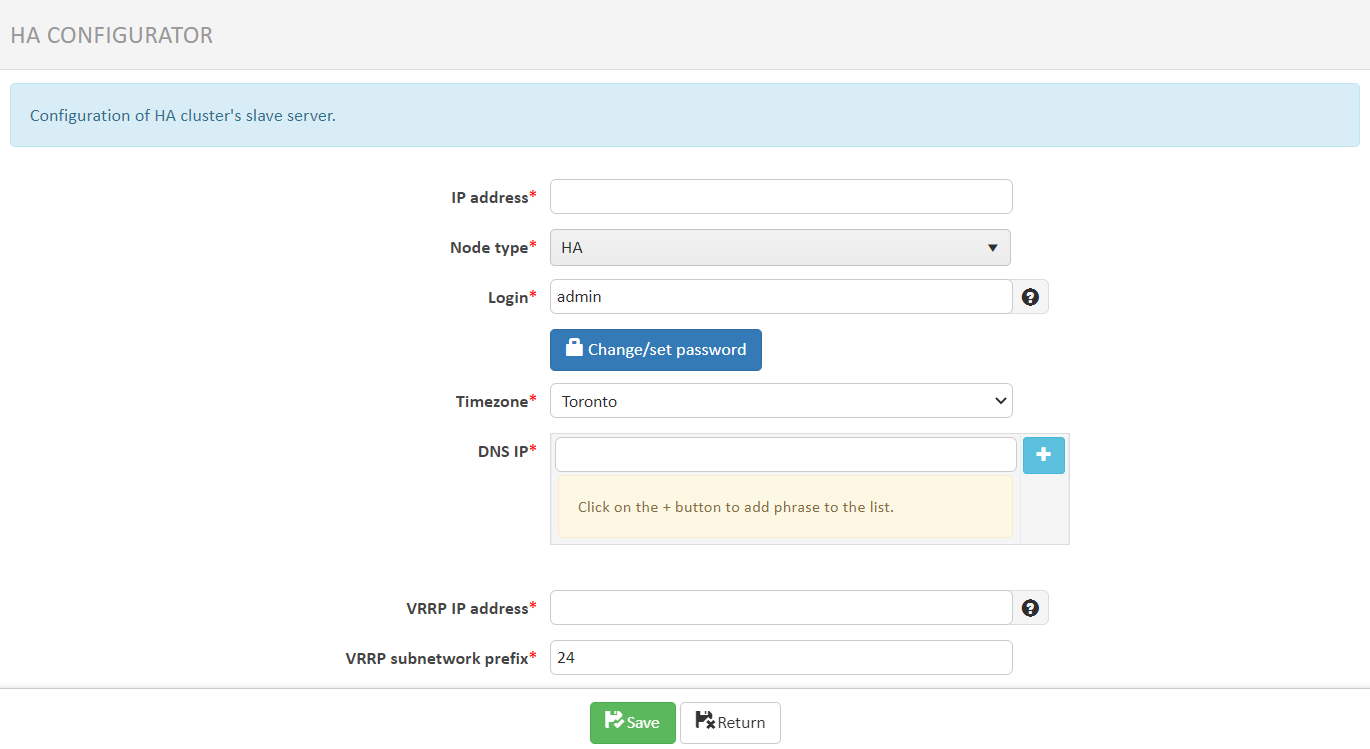
Complete the form that appears with the appropriate parameters. After confirming the set parameters with the Enter button, a summary will appear on the screen. If all the data is correct, type the letter ‘y’ and confirm your answer again with the Enter button. Then exit the installer by typing ‘y’ again and confirm with the Enter buton. Now go to the NACVIEW system. From the wizards list, select HA Cluster. Go to edit and then complete the form.

Save your set values . To upload changes to the system, press the Apply configuration button. The system will set the desired parameters within 10 minutes.
¶ 5. Network configuration
Now start your network setup by adding subnets to your system that belong to your environment. In order to do this, select IPv4 Subnets from the NACVIEW main menu, and then click Add New. Complete the form and save your set values. Repeat that for subsequent subnets.
If you want to configure DHCP, now is the right time to do so. You can use the existing instruction called DHCP (you will find it where other instructions are - on our website, in the Downloads > Documentation).
The next step is to VLANs configuration. To configure them, select VLAN from the NACVIEW main menu, and then - as in the case of subnets - click Add new item and complete the displayed form. Save the set values and repeat for subsequent VLANs.
Likewise, proceed with the Wi-Fi setup, selecting this time WiFi Networks from the main menu.
¶ 6. Configuration of network devices
The next step is to configure both support for network devices in the NACVIEW system and the physical network devices as well. Configuring network device support in NACVIEW will allow you to authenticate identities and those endpoints that attempt to access the network. From the NACVIEW system, network devices can also be monitored. For this purpose, the SNMP protocol is used. Thanks to this, it is possible to check within one management platform, m.in. whether the network device is currently working, what is its current load, memory and processor usage and how has recently passed the authorization proces. You will learn how to configure the support of a network device in the NACVIEW system in the instructions entitled Network devices. The manual, like most of them, can be found on our website in the Download > Documentation.
NACVIEW supports network devices from all manufacturers. On our website there are documents with configuration data of some of them (Download > Documentation). There are documents for network devices such as: Cisco, Juniper, HP ProCurve, 3com, DCN, Huawei Quidway. Each document includes a section on Radius server connection configuration, CoA configuration, authorization configuration, and SNMP configuration, or port group configuration.
¶ 7. Launch authentication
For the NACVIEW system to function properly, authentication must be launched. On our website, in the Downloads > Documentation tab, you will find all files that show you step by step how to configure MAB support (MAB Authorization file) and how to configure 802.1X support (802.1X Authorization file).
Bare in mind that the introduction to the 802.1X Authorization manual contains information on how to prepare your network for this protocol.
¶ 8. Configuration of supplicants
On our website, in the Downloads tab, there is also a subpage Client configuration. There you will find two types of documents. The first is the manual network configuration instructions depending on your operating system (Windows 7, Windows 10, Android, Mac OS, iOS), type of network (wired / wireless), as well as type of authorization (PEAP /TLS) .
The second type of documents are network configuration instructions via GPO service. And this allows centralized management of the operating system configuration and also running applications on multiple computers simultaneously. These documents are divided by network type (wired/wireless) and authorization type (PEAP/TLS).
There is also a supplicant setup guide on Ubuntu 20.04 LTS for wired network and 802.1x protocol. It consists of several parts, these are: PEAP Authorization, EAP-TLS Authorization, EAP-TTLS Authorization.
¶ 9. Firewall configuration
The next stage of implementation is to configure the firewall. You can do it by yourself using the protocol parameters and communication ports appropriate for the NACVIEW system. They are available in the document Components of the NACVIEW system, located on our website in the Downloads > Documentation tab.
¶ 10. Captive Portal configuration
Captive Portal is a secure and configurable method of authentication to the network. It allows you to protect yourself against excessive network traffic due to the possibility of imposing bandwidth limitations.
With the correct configuration of Captive Portal support in the NACVIEW system, users will be redirected to an external site, where they will be asked to enter a username and password for authentication. After the successful authentication, they will gain access to the desired URL and other Internet resources, in accordance with established access policies.
There is a possibility to configure the Captive Portal, both as an external service embedded in network devices and, equally as well, a portal belonging to the internal NACVIEW services. If you are interested in the first option – just use the instructions called Captive Portal (external). If you want to configure the NACVIEW Captive Portal - refer to the Captive Portal (NACVIEW).