¶ NETGEAR GS724T
| Model Name | Boot Version | Software Version |
|---|---|---|
| GS724Tv3 | B5.1.1.1 | 5.4.2.30 |
¶ RADIUS
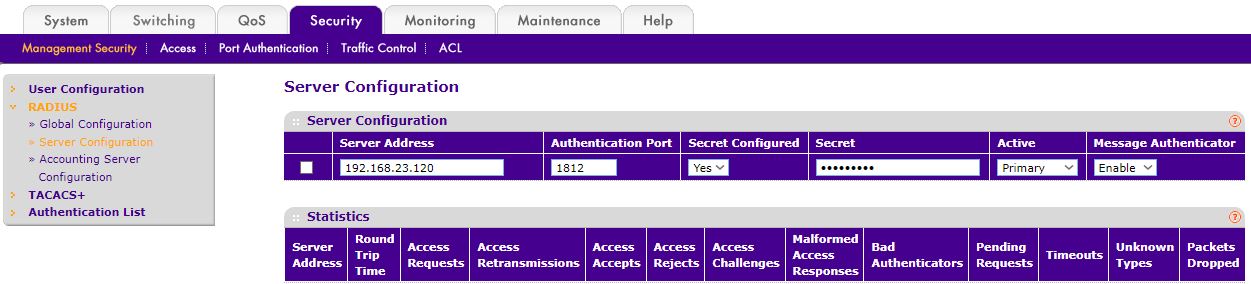
- To configure a RADIUS server go to: Security -> Management Security -> RADIUS -> Server configuration
- Add the NACVIEW IP Address.
- Set the port to 1812 (default setting, no changes required).
- In the "Secret Configured" field, select "Yes" and enter the secret key.
- Under the "Active" column, select "Primary" and enable "Message Authenticator".
- Click "Add" to finalize the server configuration.
-
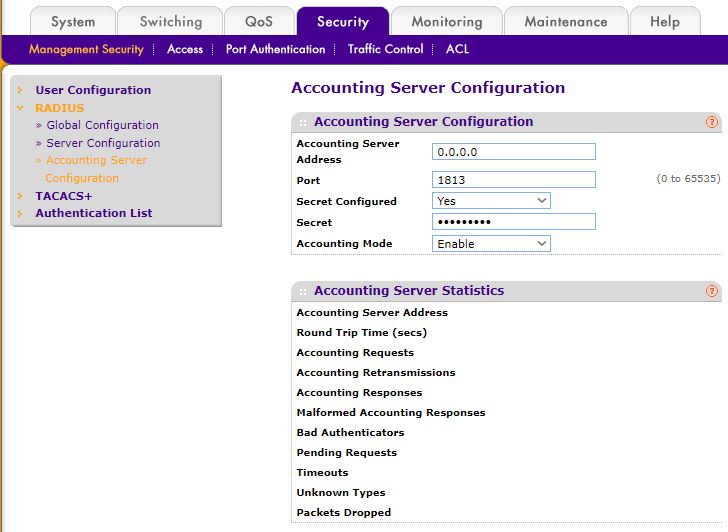
To configure a RADIUS Accounting server go to: Security -> Management Security -> RADIUS -> Accounting Server Configuration
-
Enter the NACVIEW IP Address.
-
Set the port to 1812 (default setting, no changes required).
-
In the "Secret Configured" field, select "Yes" and input the secret key.
-
Under the "Active" column, choose "Primary" and enable "Message Authenticator".
-
Click "Add" to complete the server configuration.
-
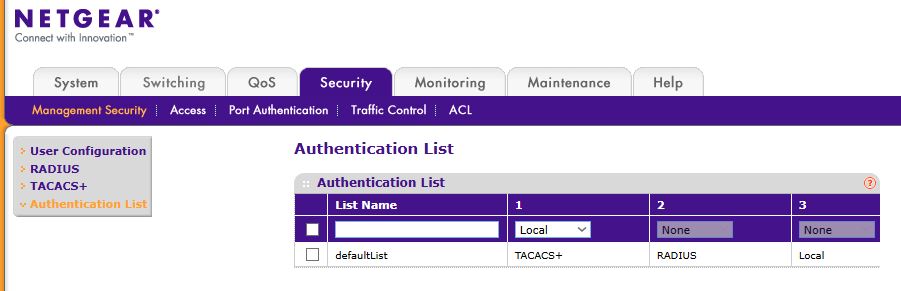
Go Authentication List to set up authentication method order. Create new list or edit existing list defaultList. Configure the list according to the screenshot below.

- Click Apply to save the settings.
Remember that Authentication List will be applied for network authentication and access to the switch as well! If secondary method will be set as "None" you can lost ability to log in to the switch.
¶ TACACS+
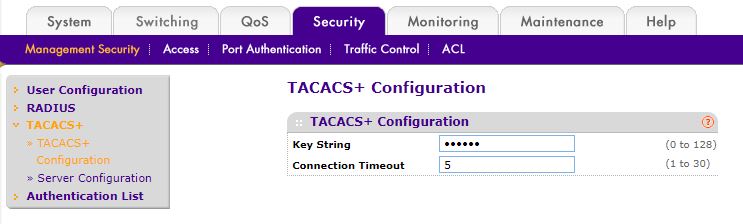
- To configure global TACACS+ settings navigate to Security → Management Security, then click the TACACS+ → TACACS+ Configuration link.
- In the Key String field, specify the authentication and encryption key for TACACS+ communications between the switch and NACVIEW.
- Click Apply to save the configuration.
- To display the TACACS+ Server Configuration page click Security → Management Security, then click the TACACS+ → Server Configuration link.
- To add a new TACACS+ server, select Add from the TACACS+ Server field, enter the IP address of the NACVIEW server to add, and click Apply.

- Go Authentication List to set up authentication method order. Create new list or edit existing list defaultList. Configure the list according to the screenshot below.
- Click Apply to save the settings.
¶ 802.1x
MAKE UPLINK AS "FORCE AUTHORIZED"!
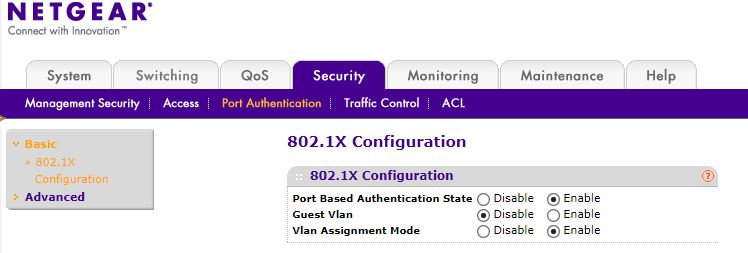
- To configure global 802.1X settings click Security → Port Authentication → Basic → 802.1X Configuration.
- Enable Port Based Authentication State.
- Enable the VLAN Assignment mode.
- To configure 802.1X settings for the port click Security → Port Authentication, then click the Advanced → Port Authentication link.
- Select the check box next to the port to configure.
- For the selected port(s), specify the following settings:
- Port Control: Auto
- Periodic Reauthentication: Enable
- Reauthentication Period: 3600
- Leave the rest of the settings as default.
- Click Apply to save the settings.

¶ SNMP
¶ SNMP V1/V2
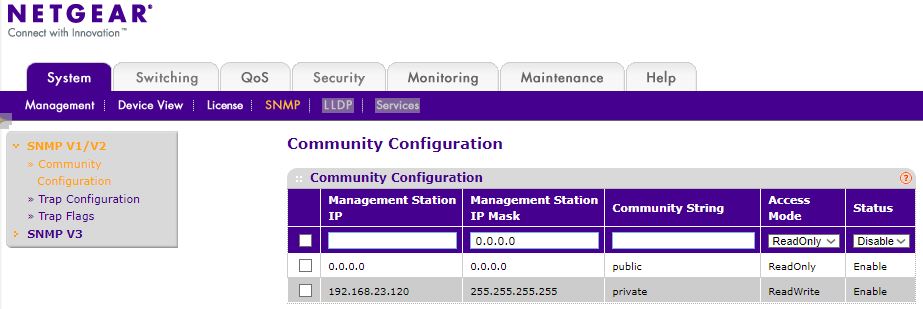
- To configure Community settings lick System → SNMP → SNMP V1/V2 → Community Configuration.
- For Management Station IP & Management Station IP Mask, specify the IP address of the NACVIEW server.
- For Community String & Access Mode, set it to private (NACVIEW needs write access).
- Set Status to Enable.
- Click Apply to save the settings.
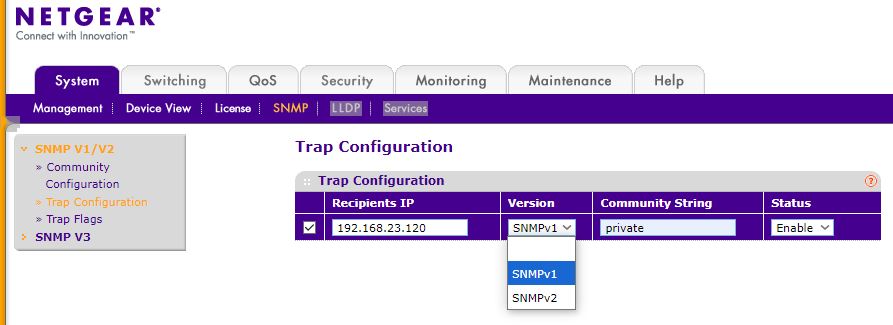
- To configure Trap settings click System → SNMP → SNMP V1/V2 → Trap Configuration.
- To add a NACVIEW server that will receive SNMP traps, enter the trap configuration information in the available fields, then click Add.
- Specify the following settings:
- Recipients IP: Th NACVIEW server address
- Version: The trap version to be used by the receiver:
- SNMP v1: Uses SNMP v1 to send traps.
- SNMP v2: Uses SNMP v2 to send traps.
- Community String: The community string for the SNMP trap packet. This can be up to 16 characters and is case sensitive.
- Status: Enable
- Click Apply to save the settings.
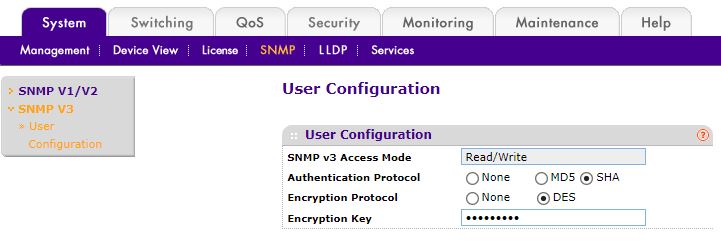
¶ SNMPv3
- To configure SNMPv3 user settings navigate to System → SNMP → SNMPv3 → User Configuration page.
- To enable authentication, select an Authentication Protocol option (either MD5 or SHA).
- To enable encryption, select the DES option in the Encryption Protocol field. Then, enter an encryption code of eight or more alphanumeric characters in the Encryption Key field.
- Click Apply to save the configuration.
¶ SYSLOG
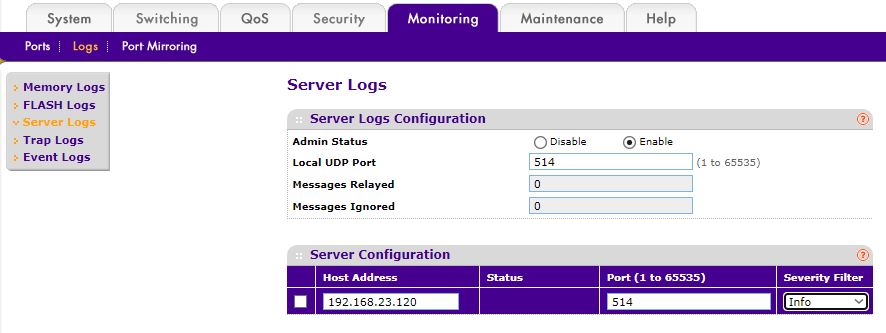
- Access the Server Log Configuration page by clicking Monitoring → Logs tab, then click the Server Log link.
- To configure local log server settings in the Admin Status field, set Enable to determine whether to send log messages to the remote syslog hosts configured on the switch.
- Leave the Local UDP Port field set to the default 514.
- Click Apply to save the settings.
- To add a remote syslog host (log server), specify the settings in the following list and click Add:
- Host Address: Specify the IP address or host name of the NACVIEW.
- Port: The default port is 514.
- Click Add to save the remote log server settings.